E - Import baskets
- 20 Jun 2023
- 6 Minutes to read
- Print
- DarkLight
- PDF
E - Import baskets
- Updated on 20 Jun 2023
- 6 Minutes to read
- Print
- DarkLight
- PDF
Article Summary
Share feedback
Thanks for sharing your feedback!
Inventory by inventory basket:
It is possible to make an inventory by displaying baskets via the sales screen. The principle is to beep all the items in an area and give a name to this basket that will create an area in the inventory change. The products will be beeped with a shower or inventory scanner. Just repeat the operation to create cart 1, 2, 3, etc.
At the end of the inventory, recall of all the baskets at once (it is impossible to recall the baskets one by one, because the next one overwrites the previous one) by the " Basket Management " menu in the inventory procedures. The rest of the inventory process is identical.
Click on " scan"
Beep the products in the first basket
Click on " transmit"

Products are displayed on the screen and can be added as needed.

At the bottom of the screen, in "Other actions", select "Create cart".
Give a name to the basket to identify in relation to an area for example.
Click on "Create cart"

Careful:
2 baskets must not have the same name.
The name of the cart is visible in "Other actions" then "Recall a cart"

To integrate the baskets at once in the inventory, click on the menu
Path: Management / Tools and settings / Periodic processing / Integration of inventory baskets

Select the user who created the carts, or "ALL" if multiple users created carts, then check the carts to integrate into the inventory.
Click on "keeping the baskets". This option allows you to keep the baskets in case of need after the integration. They must be deleted once the inventory is validated. (recommended).
Click on "baskets". This option does not keep the cart.

A message indicates that the integration is complete: Integration complete
You can always make changes to the built-in carts, by clicking on "entering and modifying inventory data"
Inventory by cart: Summary of the progress of the store inventory
If inventory of several stores, it is imperative to make an inventory and a readjustment per store before starting another.
Use of only one computer per store that makes the inventory.
Position yourself on the store for which the inventory is carried out
1. Start the preparation of total or partial inventory
2. On sale, beep the products and create the baskets by naming them
3. Open the inventory procedure
Path: Management / Tools and settings / Periodic processing / Inventory procedures / Integration of inventory baskets
4. Check the baskets to import into the inventory and integrate them at once
5. Control and modify quantities in inventory changes as required
6. Editor the differences reports, actual stock reports and inventory report and save it in a file on C:/
7. Validate and confirm inventory
Astuteness:
It is possible to mix the management of baskets with the inventory procedure by scan and wired shower.
Example: Modifying inventory data:
It is possible and advisable to go to the menu "Modification of inventory data" to:
➢ check if there are gencod or reference errors in the inventory (Inventory errors)
➢ check during the inventory or at the end of the inventory the quantities inventoried in relation to the theoretical stock (inventory data).
Path: Management / periodic processing / inventory procedures / Entry and modification of inventory data

➢ Data type: Inventory data

Allows to visualize by reference / color / size, designation and Gencod or PID, the theoretical stock and the inventoried stock (stock real) to make controls and correct them live if necessary.
The "Location" column allows you to locate in which these products have been counted in order to facilitate searches.
To commit a quantity change on a line: Change the quantity and press the TAB key on the keyboard.
Search
➢ Allows you to search for a particular product by the reference or by the gencod, then click on "Filter"

➢ Data type: Inventory errors
This function makes it possible to identify products whose reference or gencod is incorrect.


Inventory States:
Path : Management / Tools and settings / Periodic treatments / Stocks / Inventory procedures
These reports must be recorded in a file, see procedure to be followed in point 5.1.
They can also be printed in A4 format, it is possible to output them in PDF or OLAP (excel):

Careful:
These will no longer be available after validation of the inventory.
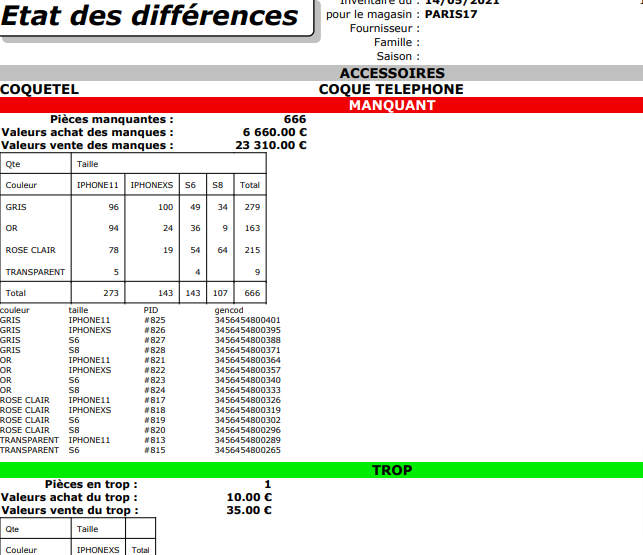
The states of differences:
This statement displays the details of inventory achievements in relation to the theoretical stock by reference (missing products and excess products).

Saving to a C:/ file saves inventory data.
The file must be saved to your PC's desktop as follows:
Click on "Print"
Astuteness:
it is possible to save the file in PDF format. To do this, set the printing to
"Screen" in the Fastmag tab at the top left and select "printers".
"Screen" in the Fastmag tab at the top left and select "printers".
- Then print and click on "print to file", "type: PDF file", then place it wherever you want. Ditto to record it in excellent.
- Check the "Print to file" box
- Select File Type: PDF File
- Select where the file will be stored: choose "Desktop"
- Click OK

Specify the file name and inventory date and click Save. Click OK

This registration operation will be performed for all inventory reports. It can also be saved in Excel format.

Status of differences by Color / Size for a store:
This state is the same as the state of detailed differences in color and size. This file must be saved to be saved.
Status of actual inventory stock:
This statement lists the details of the items that have been planned, so it is the actual stock. This file must be saved to be saved.
The valuation of the stock is done on the last purchase price of the item, so it is displayed for informational purposes. To have a real stock valuation, it is imperative to exit after inventory validation, the stock valuation status in purchase price is in the status menu and product reports of the item sheet.

The inventory report:
This report shows you all the missing quantities as well as the total amount of the shortage. It indicates the quantity on sale as well as the amount of the balance. This file must be saved to be saved.
It is a report that displays you globally (all references) and one line per store, missing and excess quantities after the shop has beeped all the products in stock. (quantities are valued at purchase prices).

Validating an inventory
Path: Management / Tools and settings / Periodic processing / Stocks / Inventory procedures / Inventory validation

It is still possible to go back to this level by clicking on "Back to inventory menu".
NB: By clicking on "Validation of the inventory", the procedure is irreversible. The existing stock will be overwritten and the inventoried stock will be effective in Fastmag.
The validation distributes a receipt by supplier with the justification "INVENTORY OK".
Important:
To have a real stock valuation, it is imperative to exit after inventory validation, the stock valuation status in purchase price is in the status menu and product reports of the item sheet.
NB : These receptions replace inventory preparation receptions.
The quantity area corresponds to inventory readjustment movements, the stock area corresponds to the resulting quantity in stock of each item after validation.
Inventory cancellation:

Cancels any inventory that is being prepared. You will be asked for confirmation before any deletion.
NB:
This authorized cancellation of cancellation receipts with proof "INVENTORY CANCELED."
Allow acknowledgements during an inventory:
It is possible to authorize receipts during an inventory simply by clicking on "Allow acknowledgements of receipt during an inventory".

Attention :
This manipulation is really not advisable.
User Help:
It is possible to contact our user support 7 days a week (except public holidays) from 9am to 7pm on weekdays and from 10am to 7pm on weekends (except lunch break from 1pm to 2pm) at the following coordinates:
FASTMAG
32 rue d'Armaillé 75017 Paris
Hotline telephone: 00 33 (1) 83 64 2000
Was this article helpful?